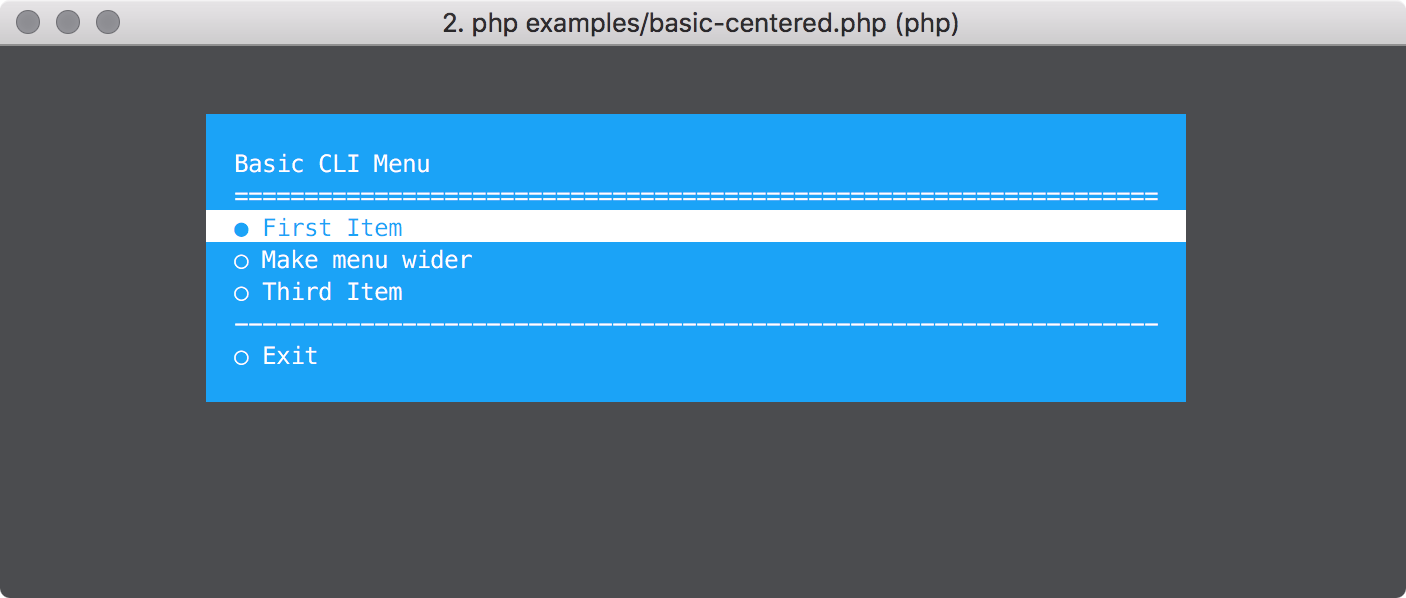
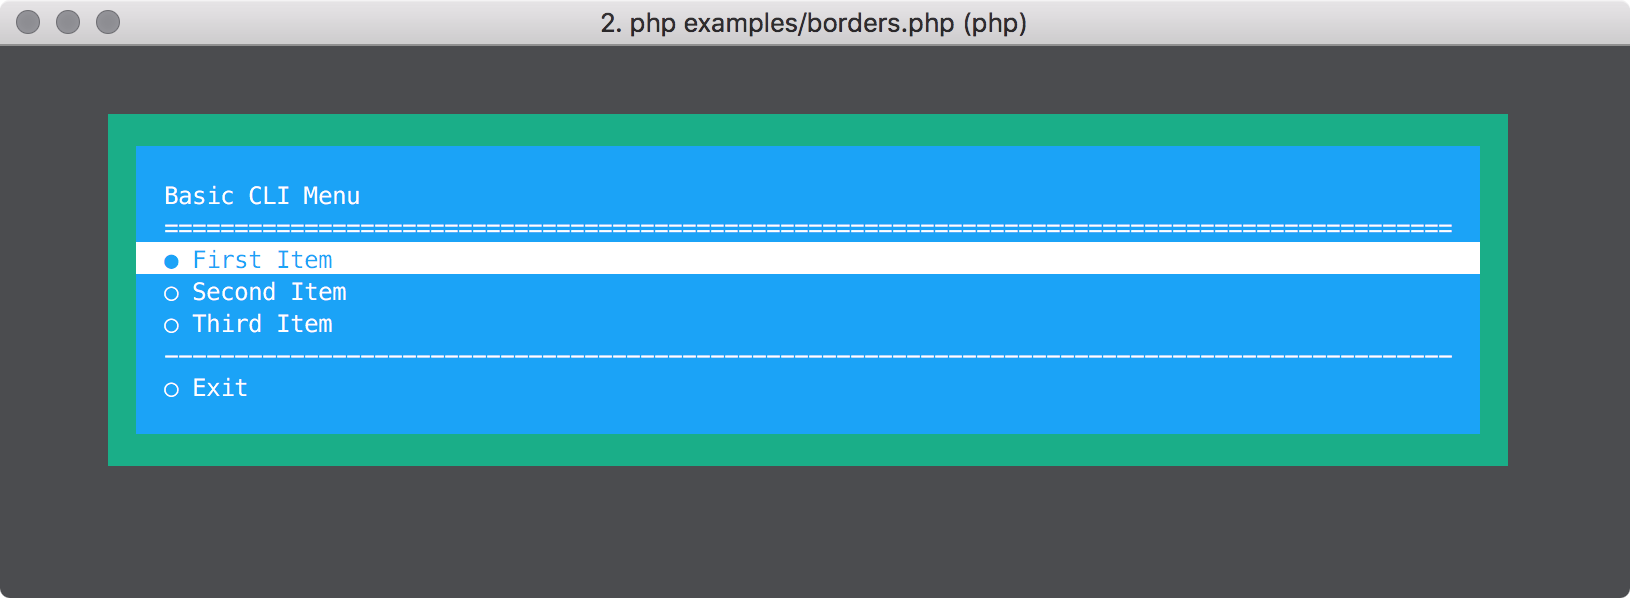
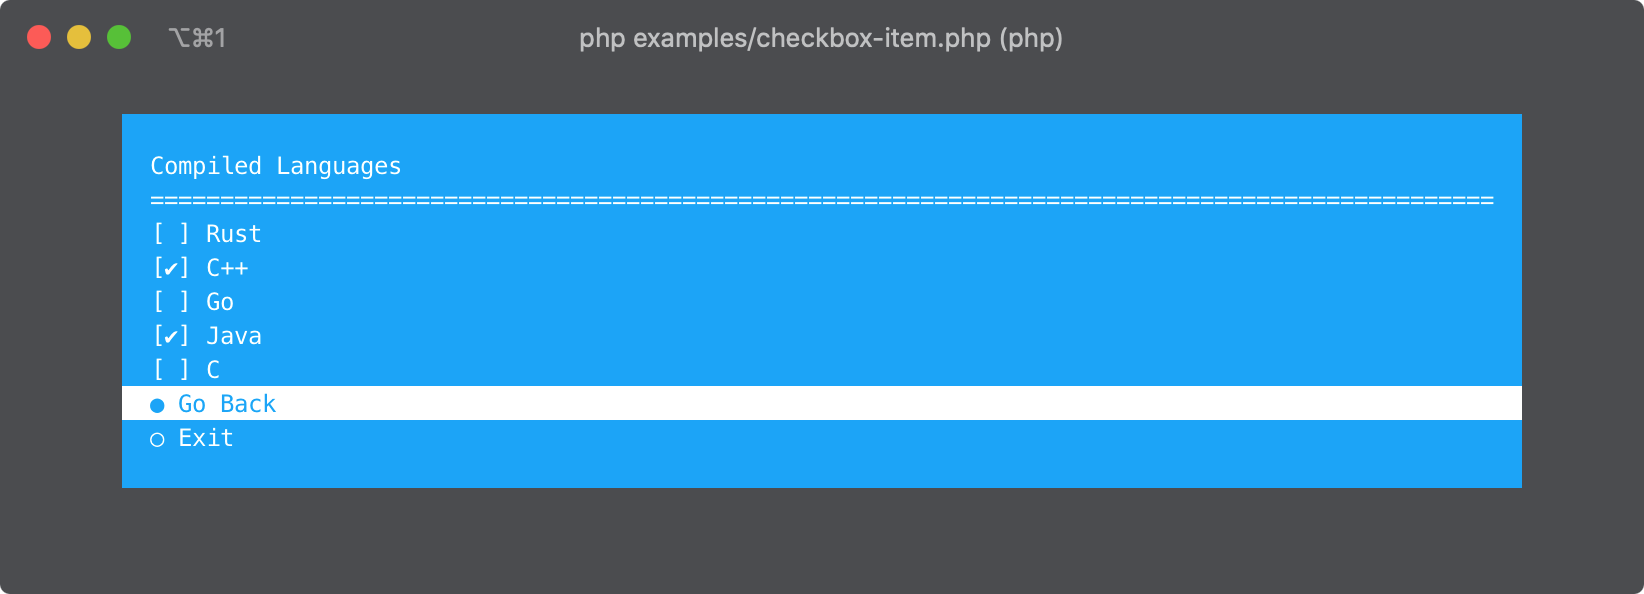
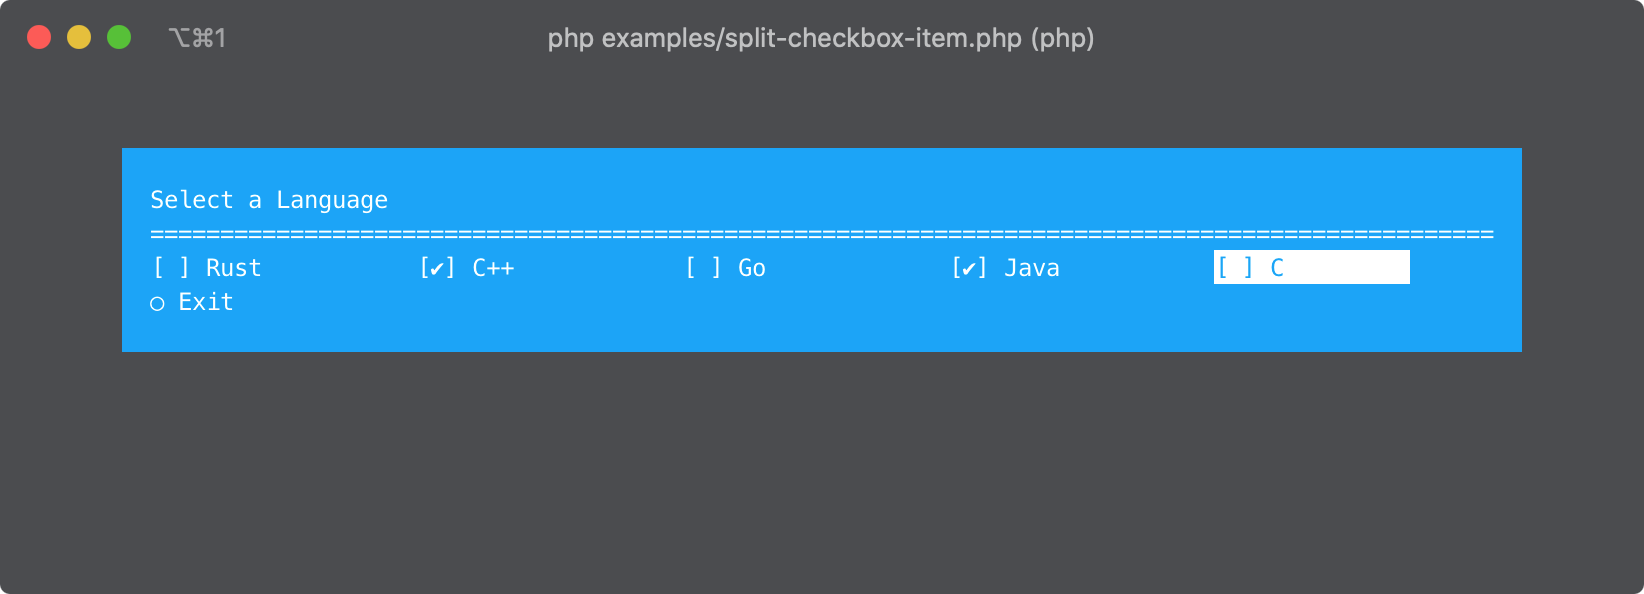
🖥 Build beautiful PHP CLI menus. Simple yet Powerful. Expressive DSL.

Overview


Contents

Minimum Requirements

  • PHP 7.1
  • Composer
  • ext-posix

Installation

composer require php-school/cli-menu

Upgrading

Please refer to the Upgrade Documentation documentation to see what is required to upgrade your installed cli-menu version.

Usage

Quick Setup

Here is a super basic example menu which will echo out the text of the selected item to get you started.

<?php

use PhpSchool\CliMenu\CliMenu;
use PhpSchool\CliMenu\Builder\CliMenuBuilder;

require_once(__DIR__ . '/../vendor/autoload.php');

$itemCallable = function (CliMenu $menu) {
    echo $menu->getSelectedItem()->getText();
};

$menu = (new CliMenuBuilder)
    ->setTitle('Basic CLI Menu')
    ->addItem('First Item', $itemCallable)
    ->addItem('Second Item', $itemCallable)
    ->addItem('Third Item', $itemCallable)
    ->addLineBreak('-')
    ->setBorder(1, 2, 'yellow')
    ->setPadding(2, 4)
    ->setMarginAuto()
    ->build();


$menu->open();

Examples

Check out the examples directory and run them to see what is possible! The best way to run the examples is to git clone the repository:

git clone https://github.com/php-school/cli-menu.git
cd cli-menu
composer install --no-dev
cd examples
php basic.php

Basic Menu

basic

Basic Menu Auto Centered

submenu

Basic Menu with separation

basic-seperation

Menu with crazy separation

crazy-seperation

Custom Styles

custom-styles

Borders and 256 colours

submenu

Useful Separation

useful-seperation

Displaying Item Extra

item-extra

Remove Defaults

remove-defaults

Submenu

submenu

submenu-options

Split Item

split-item

Disabled Items & Submenus

submenu

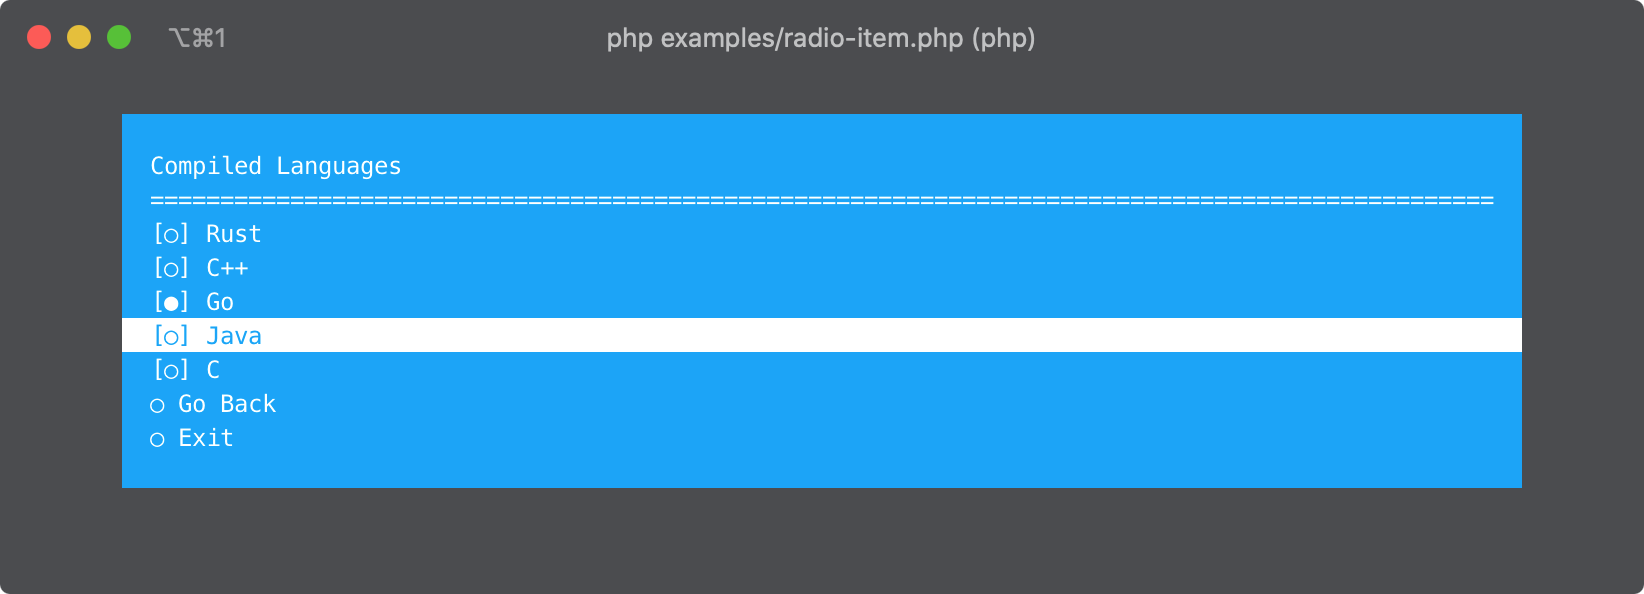
Checkbox Items

checkbox

checkbox-split

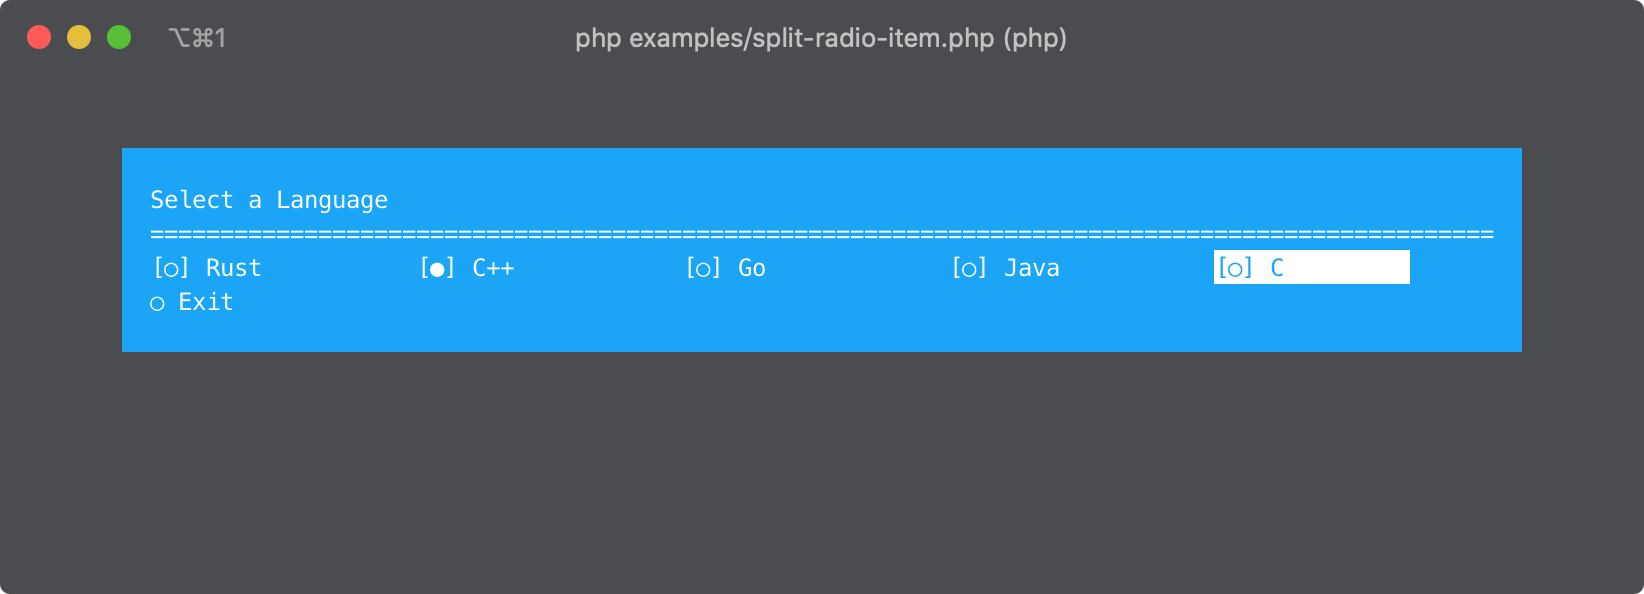
Radio Items

radio

radio-split

Flash Dialogue

submenu

Confirm Dialogue

submenu

Number Input

submenu

submenu

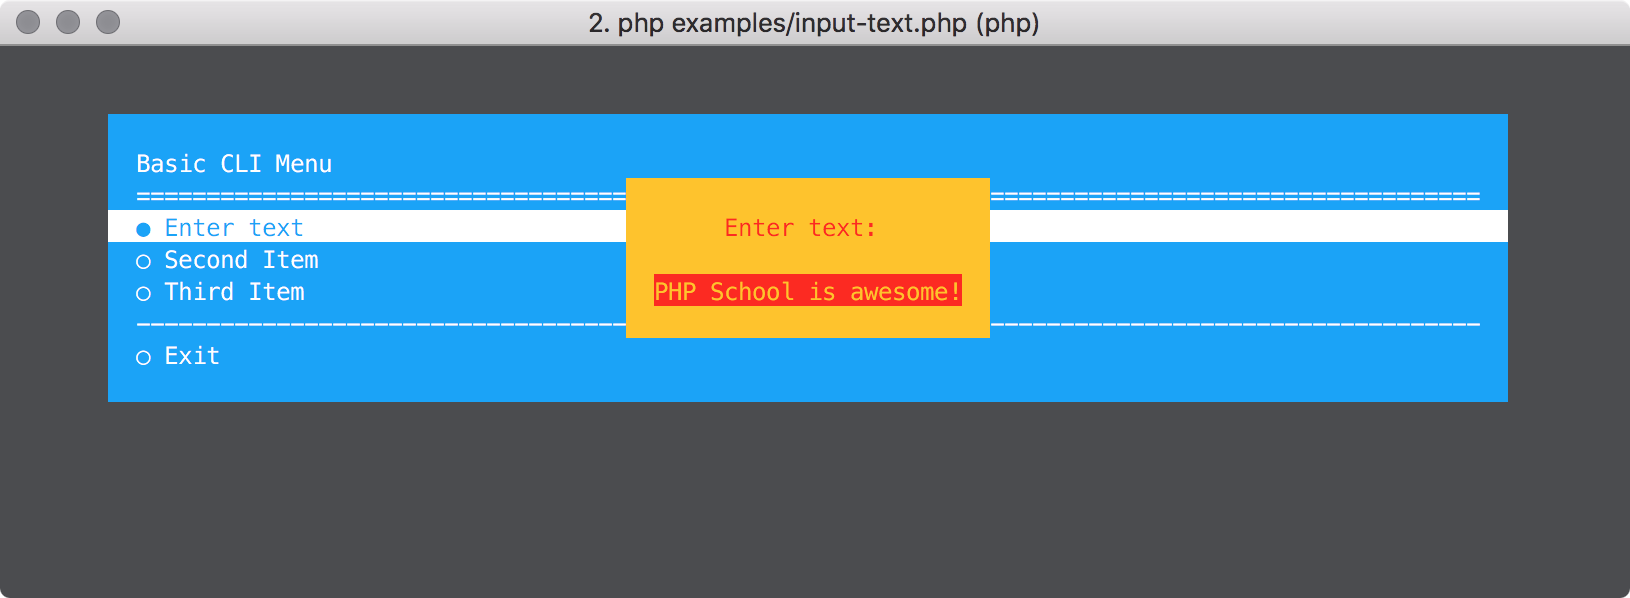
Text Input

submenu

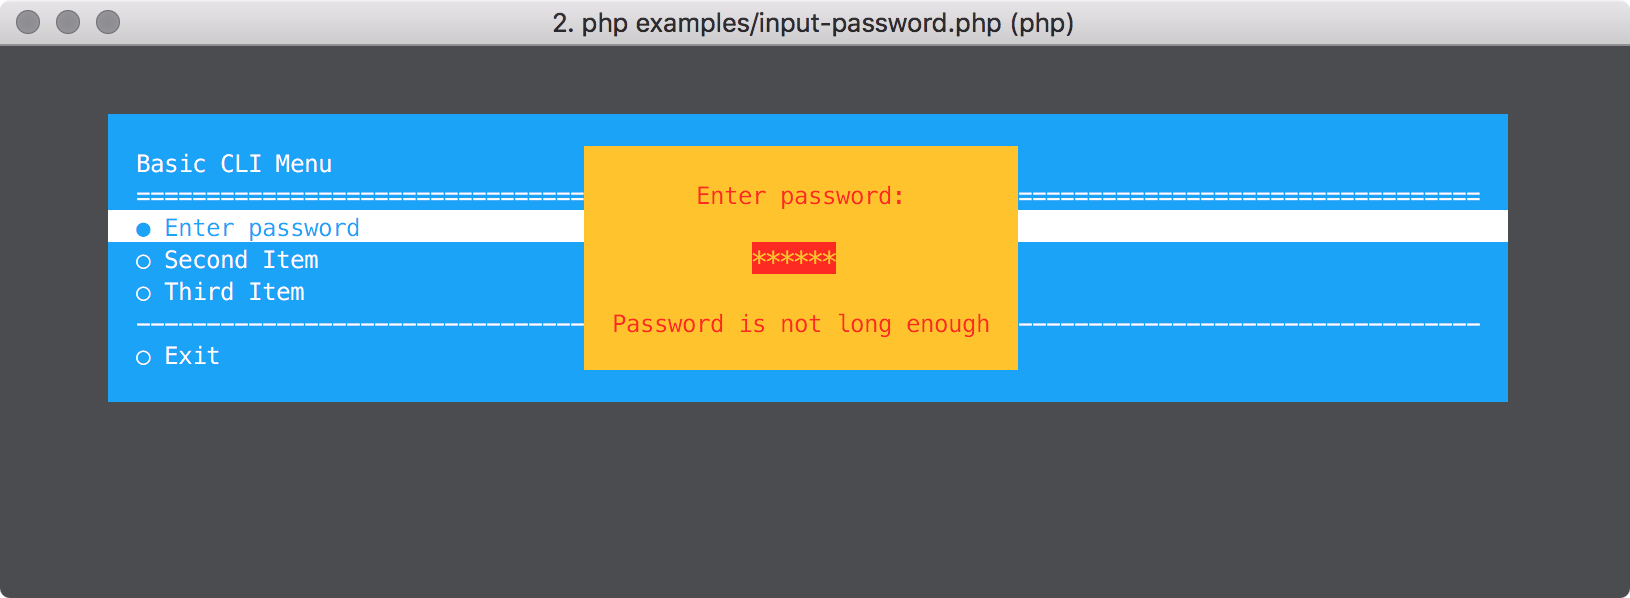
Password Input

submenu

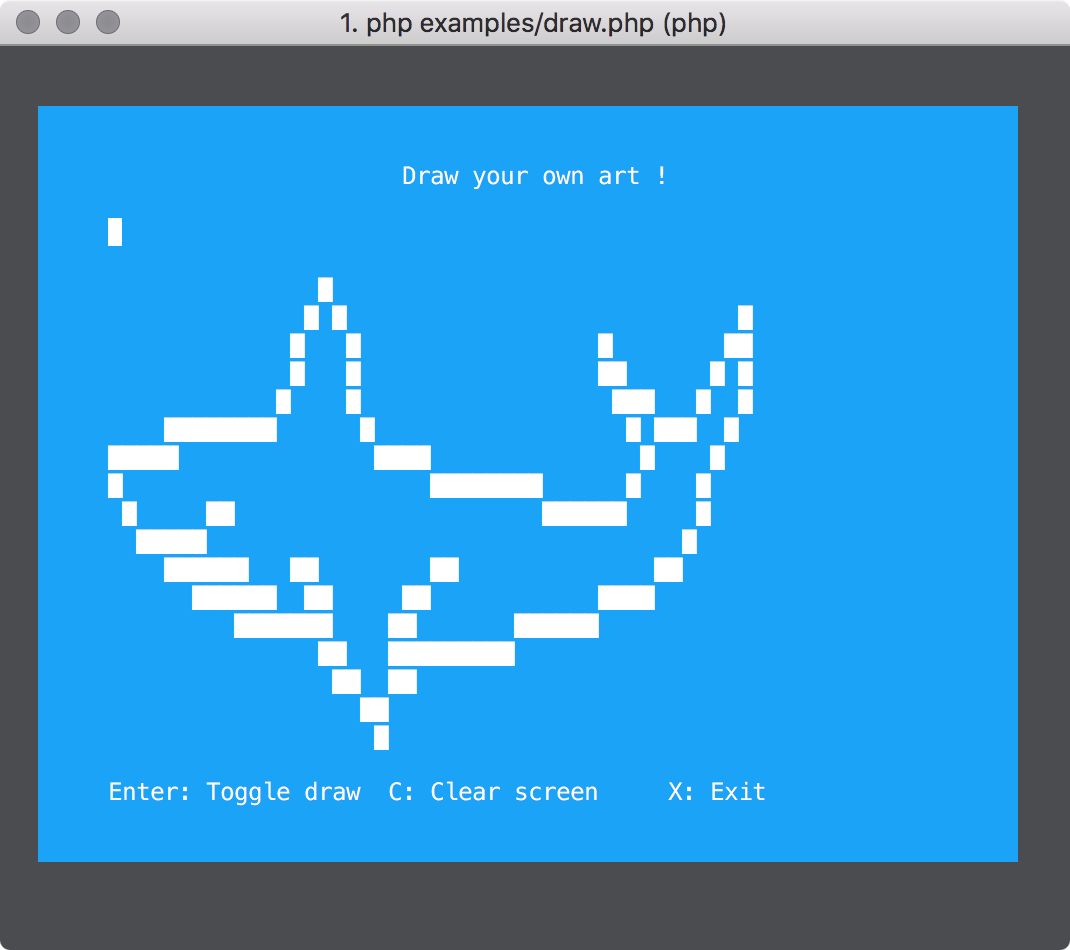
Using cli-menu to create art

Want to see something really cool? Well you can use cli-menu to create a drawing canvas on your terminal. Check it out!:

submenu

API

The CliMenu object is constructed via the Builder class

<?php

use PhpSchool\CliMenu\Builder\CliMenuBuilder;

$menu = (new CliMenuBuilder)
    /**
     *  Customise
    **/
    ->build();

Once you have a menu object, you can open and close it like so:

$menu->open();
$menu->close();

Appearance

Menu Title

You can give your menu a title and you can customise the separator, a line which displays under the title. Whatever string you pass to setTitleSeparator will be repeated for the width of the Menu.

<?php

use PhpSchool\CliMenu\Builder\CliMenuBuilder;

$menu = (new CliMenuBuilder)
    ->setTitle('One Menu to rule them all!')
    ->setTitleSeparator('*-')
    ->build();

Colour

You can change the foreground and background colour of the menu to any of the following colours:

  • black
  • red
  • green
  • yellow
  • blue
  • magenta
  • cyan
  • white
<?php

use PhpSchool\CliMenu\Builder\CliMenuBuilder;

$menu = (new CliMenuBuilder)
    ->setForegroundColour('green')
    ->setBackgroundColour('black')
    ->build();

If your terminal supports 256 colours then you can also use any of those by specifying the code, like 230. You can find a list of the colours and codes here. If you specify a code and the terminal does not support 256 colours it will automatically fallback to a sane default, using a generated map you can see in src/Util/ColourUtil.php. You can also manually specify the fallback colour as the second argument to setForegroundColour and `setBackgroundColour.

In this example if no 256 colour support is found it will automatically fall back to green and blue.

<?php

use PhpSchool\CliMenu\Builder\CliMenuBuilder;

$menu = (new CliMenuBuilder)
    ->setForegroundColour('40')
    ->setBackgroundColour('92')
    ->build();

In this example if no 256 colour support is found it will fall back to yellow and magenta.

<?php

use PhpSchool\CliMenu\Builder\CliMenuBuilder;

$menu = (new CliMenuBuilder)
    ->setForegroundColour('40', 'yellow')
    ->setBackgroundColour('92', 'magenta')
    ->build();

Width

Customise the width of the menu. Setting a value larger than the size of the terminal will result in the width being the same as the terminal size. The width will include the padding and the border. So with a width of 100 and all around border of 5 and all around padding of 5 will leave for a content width of 80 (5 + 5 + 80 + 5 + 5).

<?php

use PhpSchool\CliMenu\Builder\CliMenuBuilder;

$menu = (new CliMenuBuilder)
    ->setWidth(1000) //if terminal is only 400, width will also be 400
    ->build();

If you want to use the full width of the terminal, you can grab the terminal object and ask/set it from there like so:

<?php

use PhpSchool\CliMenu\Builder\CliMenuBuilder;

$menu = ($builder = new CliMenuBuilder)
    ->setWidth($builder->getTerminal()->getWidth())
    ->build();

If you want to use the full width of the terminal and apply a margin, use the terminal width, and we will do the calculations automatically (shrink the width based on the margin).

<?php

use PhpSchool\CliMenu\Builder\CliMenuBuilder;

$menu = ($builder = new CliMenuBuilder)
    ->setWidth($builder->getTerminal()->getWidth())
    ->setMargin(2)
    ->build();

Padding

The padding can be set for all sides with one value or can be set individually for top/bottom and left/right.

<?php

use PhpSchool\CliMenu\Builder\CliMenuBuilder;

$menu = (new CliMenuBuilder)
    ->setPadding(10) //10 padding top/bottom/left/right
    ->build();

Different values can also be set for the top/bottom and the left/right padding:

<?php

use PhpSchool\CliMenu\Builder\CliMenuBuilder;

$menu = (new CliMenuBuilder)
    ->setPaddingTopBottom(10)
    ->setPaddingLeftRight(5)
    ->build();

Configure top/bottom and left/right padding using the shorthand method:

<?php

use PhpSchool\CliMenu\Builder\CliMenuBuilder;

$menu = (new CliMenuBuilder)
    ->setPadding(10, 5) //top/bottom = 10, left/right = 5
    ->build();

Margin

The margin can be customised as one value. It can also be set automatically which will center the menu nicely in the terminal.

Automatically center menu:

<?php

use PhpSchool\CliMenu\Builder\CliMenuBuilder;

$menu = (new CliMenuBuilder)
    ->setWidth(200)
    ->setMarginAuto() 
    ->build();

Arbitrary margin:

<?php

use PhpSchool\CliMenu\Builder\CliMenuBuilder;

$menu = (new CliMenuBuilder)
    ->setWidth(200)
    ->setMargin(5)
    ->build();

Borders

Borders can be customised just like CSS borders. We can add any amount of border to either side, left, right top or bottom and we can apply a colour to it.

Set universal red border of 2:

<?php

use PhpSchool\CliMenu\Builder\CliMenuBuilder;

$menu = (new CliMenuBuilder)
    ->setWidth(200)
    ->setBorder(2, 'red')
    ->build();

Configure each border separately:

<?php

use PhpSchool\CliMenu\Builder\CliMenuBuilder;

$menu = (new CliMenuBuilder)
    ->setWidth(200)
    ->setBorderTopWidth(2)
    ->setBorderRightWidth(4)
    ->setBorderBottomWidth(2)
    ->setBorderLeftWidth(4)
    ->setBorderColour('42', 'red') //SpringGreen2 fallback to red
    ->build();

Configure each border separately using the shorthand method, like CSS:

<?php

use PhpSchool\CliMenu\Builder\CliMenuBuilder;

$menu = (new CliMenuBuilder)
    ->setWidth(200)
    ->setBorder(3, 4, 'red') //top/bottom = 3, left/right = 4
    ->setBorder(3, 4, 5, 'red') //top = 3, left/right = 4, bottom = 5
    ->setBorder(3, 4, 5, 6, 'red') //top = 3, left = 4, bottom = 5, right = 6
    ->build();

Exit Button Text

Modify the exit button text:

<?php

use PhpSchool\CliMenu\Builder\CliMenuBuilder;

$menu = (new CliMenuBuilder)
    ->setExitButtonText("Don't you want me baby?")
    ->build();

Remove Exit Button

You can remove the exit button altogether:

<?php

use PhpSchool\CliMenu\Builder\CliMenuBuilder;

$menu = (new CliMenuBuilder)
    ->disableDefaultItems()
    ->build();

Note: This will also disable the Go Back button for sub menus.

You can manually add exit and go back buttons using the following:

<?php

use PhpSchool\CliMenu\Builder\CliMenuBuilder;
use PhpSchool\CliMenu\Action\ExitAction;
use PhpSchool\CliMenu\Action\GoBackAction;

$menu = (new CliMenuBuilder)
    ->disableDefaultItems()
    ->addSubMenu('Super Sub Menu', function (CliMenuBuilder $b) {
        $b->disableDefaultItems()
            ->setTitle('Behold the awesomeness')
            ->addItem('Return to parent menu', new GoBackAction); //add a go back button
    })
    ->addItem('Leave this place now !', new ExitAction) //add an exit button
    ->build();

Items

There a few different types of items you can add to your menu

  • Selectable Item - This is the type of item you need for something to be selectable (you can hit enter and it will invoke your callable)
  • Checkbox Item - This is a checkbox type of item that keeps track of its toggled state to show a different marker.
  • Radio Item - This is a radio type of item that keeps track of its toggled state to show a different marker. Disables all other radios within its CliMenu level.
  • Line Break Item - This is used to break up areas, it can span multiple lines and will be the width of Menu. Whatever string is passed will be repeated.
  • Static Item - This will print whatever text is passed, useful for headings.
  • Ascii Art Item - Special item which allows usage of Ascii art. It takes care of padding and alignment.
  • Sub Menu Item - Special item to allow an item to open another menu. Useful for an options menu.
  • Split Item - Special item to fit multiple items on the same row.

Selectable Item

<?php

use PhpSchool\CliMenu\Builder\CliMenuBuilder;
use PhpSchool\CliMenu\CliMenu;

$menu = (new CliMenuBuilder)
    ->addItem('The Item Text', function (CliMenu $menu) { 
        echo 'I am alive!'; 
    })
    ->build();

You can add multiple items at once like so:

<?php

use PhpSchool\CliMenu\Builder\CliMenuBuilder;
use PhpSchool\CliMenu\CliMenu;

$callable = function (CliMenu $menu) {
    echo 'I am alive!';
};

$menu = (new CliMenuBuilder)
    ->addItems([
        ['Item 1', $callable],
        ['Item 2', $callable],
        ['Item 3', $callable],
    ])
    ->build();

Note: You can add as many items as you want and they can all have a different action. The action is the second parameter and must be a valid PHP callable. Try using an Invokable class to keep your actions easily testable.

Checkbox Item

<?php

use PhpSchool\CliMenu\Builder\CliMenuBuilder;
use PhpSchool\CliMenu\CliMenu;

$callable = function (CliMenu $menu) {
    echo $menu->getSelectedItem()->getText();
};

$menu = (new CliMenuBuilder)
    ->addCheckboxItem('Item 1', $callable)
    ->addCheckboxItem('Item 2', $callable)
    ->addCheckboxItem('Item 3', $callable)
    ->build();

You can add multiple checkbox items at once like so:

<?php

use PhpSchool\CliMenu\Builder\CliMenuBuilder;
use PhpSchool\CliMenu\CliMenu;

$callable = function (CliMenu $menu) {
    echo 'I am alive!';
};

$menu = (new CliMenuBuilder)
    ->addCheckboxItems([
        ['Item 1', $callable],
        ['Item 2', $callable],
        ['Item 3', $callable],
    ])
    ->build();

When selecting an item, it will be toggled. Notice at first each item is unchecked. After selecting one it will become checked.

Radio Item

<?php

use PhpSchool\CliMenu\Builder\CliMenuBuilder;
use PhpSchool\CliMenu\CliMenu;

$callable = function (CliMenu $menu) {
    echo $menu->getSelectedItem()->getText();
};

$menu = (new CliMenuBuilder)
    ->addRadioItem('Item 1', $callable)
    ->addRadioItem('Item 2', $callable)
    ->addRadioItem('Item 3', $callable)
    ->build();

You can add multiple radio items at once like so:

<?php

use PhpSchool\CliMenu\Builder\CliMenuBuilder;
use PhpSchool\CliMenu\CliMenu;

$callable = function (CliMenu $menu) {
    echo 'I am alive!';
};

$menu = (new CliMenuBuilder)
    ->addRadioItems([
        ['Item 1', $callable],
        ['Item 2', $callable],
        ['Item 3', $callable],
    ])
    ->build();

When selecting an item, it will be toggled. Notice at first each item is unchecked. After selecting one it will become checked and all other RadioItem within the same level will be unchecked.

Line Break Item

<?php

use PhpSchool\CliMenu\Builder\CliMenuBuilder;

$menu = (new CliMenuBuilder)
    ->addLineBreak('<3', 2)
    ->build();

The above would repeat the character sequence <3 across the Menu for 2 lines

Static Item

Static items are similar to Line Breaks, however, they don't repeat and fill. It is output as is. If the text is longer than the width of the Menu, it will be continued on the next line.

<?php

use PhpSchool\CliMenu\Builder\CliMenuBuilder;

$menu = (new CliMenuBuilder)
    ->addStaticItem('AREA 1')
    //add some items here
    ->addStaticItem('AREA 2')
    //add some boring items here
    ->addStaticItem('AREA 51')
    //add some top secret items here 
    ->build();

Ascii Art Item

The following will place the Ascii art in the centre of your menu. Use these constants to alter the alignment:

  • AsciiArtItem::POSITION_CENTER
  • AsciiArtItem::POSITION_LEFT
  • AsciiArtItem::POSITION_RIGHT
<?php

use PhpSchool\CliMenu\Builder\CliMenuBuilder;
use PhpSchool\CliMenu\MenuItem\AsciiArtItem;

$art = <<<ART
        _ __ _
       / |..| \
       \/ || \/
        |_''_|
      PHP SCHOOL
LEARNING FOR ELEPHANTS
ART;

$menu = (new CliMenuBuilder)
    ->addAsciiArt($art, AsciiArtItem::POSITION_CENTER)
    ->build();

The third optional parameter to addAsciiArt is alternate text. If the ascii art is too wide for the terminal, then it will not be displayed at all. However, if you pass a string to the third argument, in the case that the ascii art is too wide for the terminal the alternate text will be displayed instead.

Sub Menu Item

Sub Menus are really powerful! You can add Menus to Menus, whattttt?? You can have your main menu and then an options menu. The options item will look like a normal item except when you hit it, you will enter to another menu, which can have different styles and colours!

<?php

use PhpSchool\CliMenu\Builder\CliMenuBuilder;
use PhpSchool\CliMenu\CliMenu;

$callable = function (CliMenu $menu) {
    echo "I'm just a boring selectable item";
};

$menu = (new CliMenuBuilder)
    ->addItem('Normal Item', $callable)
    ->addSubMenu('Super Sub Menu', function (CliMenuBuilder $b) {
        $b->setTitle('Behold the awesomeness')
            ->addItem(/** **/);
    })
    ->build();

In this example a single sub menu will be created. Upon entering the sub menu, you will be able to return to the main menu or exit completely. A Go Back button will be automatically added. You can customise this text using the ->setGoBackButtonText() method on the CliMenuBuilder instance for the sub menu.

There are a few things to note about the syntax and builder process here

  1. The first parameter to addSubMenu is the text to be displayed on the menu which you select to enter the submenu.
  2. The second parameter is a closure, which will be invoked with a new instance of CliMenuBuilder which you can use to customise the sub menu exactly the same way you would the parent
  3. If you do not modify the styles of the sub menu (eg, colours) it will inherit styles from the parent!

If you have already have a configured menu builder you can just pass that to addSubMenuFromBuilder and be done:

<?php

use PhpSchool\CliMenu\Builder\CliMenuBuilder;

$subMenuBuilder = (new CliMenuBuilder)
    ->setTitle('Behold the awesomeness')
    ->addItem(/** **/);

$menu = (new CliMenuBuilder)
    ->addSubMenuFromBuilder('Super Sub Menu', $subMenuBuilder)
    ->build();

Note: The submenu menu item will be an instance of \PhpSchool\CliMenu\MenuItem\MenuMenuItem. If you need access to the submenu, you can get it via $menuMenuItem->getSubMenu().

Split Item

Split Items allows you to add multiple items on the same row. The full width of the menu will be split evenly between all items. You can move between those items using left/right arrows.

You can set the number of spaces separating items using ->setGutter() (defaults to 2).

Only Selectable, Checkbox, Radio, Static and SubMenu items are currently allowed inside a Split Item.

<?php

use PhpSchool\CliMenu\Builder\CliMenuBuilder;
use PhpSchool\CliMenu\Builder\SplitItemBuilder;
use PhpSchool\CliMenu\CliMenu;

$itemCallable = function (CliMenu $menu) {
    echo $menu->getSelectedItem()->getText();
};

$menu = (new CliMenuBuilder)
    ->setWidth(150)
    ->addStaticItem('Below is a SplitItem')
    ->addSplitItem(function (SplitItemBuilder $b) use ($itemCallable) {
        $b->setGutter(5)
            ->addSubMenu('Sub Menu on a split item', function (CliMenuBuilder $b) {
                $b->setTitle('Behold the awesomeness')
                    ->addItem('This is awesome', function() { print 'Yes!'; });
            })
            ->addItem('Item 2', $itemCallable)
            ->addStaticItem('Item 3 - Static');
    })
    ->build();

$menu->open();

There are a few things to note about the syntax and builder process here:

  1. The first parameter to addSplitItem is a closure, which will be invoked with a new instance of SplitItemBuilder which you can use to add items to the split item.
  2. You can call addItem, addCheckboxItem, addRadioItem, addSubMenu and addStaticItem on the SplitItemBuilder.
  3. SplitItemBuilder has a fluent interface so you can chain method calls.

Disabling Items & Sub Menus

In this example we are disabling certain items and a submenu but still having them shown in the menu.

<?php

use PhpSchool\CliMenu\Builder\CliMenuBuilder;
use PhpSchool\CliMenu\CliMenu;

$itemCallable = function (CliMenu $menu) {
    echo $menu->getSelectedItem()->getText();
};

$menu = (new CliMenuBuilder)
    ->setTitle('Basic CLI Menu Disabled Items')
    ->addItem('First Item', $itemCallable)
    ->addItem('Second Item', $itemCallable, false, true)
    ->addItem('Third Item', $itemCallable, false, true)
    ->addSubMenu('Submenu', function (CliMenuBuilder $b) use ($itemCallable) {
        $b->setTitle('Basic CLI Menu Disabled Items > Submenu')
            ->addItem('You can go in here!', $itemCallable);
    })
    ->addSubMenu('Disabled Submenu', function (CliMenuBuilder $b) use ($itemCallable) {
        $b->setTitle('Basic CLI Menu Disabled Items > Disabled Submenu')
            ->addItem('Nope can\'t see this!', $itemCallable)
            ->disableMenu();
    })
    ->addLineBreak('-')
    ->build();

The third param on the ->addItem call is what disables an item while the ->disableMenu() call disables the relevant menu.

The outcome is a full menu with dimmed rows to denote them being disabled. When a user navigates the menu these items are jumped over to the next available selectable item.

Item Markers

The marker displayed by the side of the currently active item can be modified, UTF-8 characters are supported. The marker for un-selected items can also be modified. If you want to disable it, just set it to an empty string. Item markers only display on selectable items, which are: \PhpSchool\CliMenu\MenuItem\SelectableItem & \PhpSchool\CliMenu\MenuItem\MenuMenuItem.

<?php

use PhpSchool\CliMenu\Builder\CliMenuBuilder;
use PhpSchool\CliMenu\Style\SelectableStyle;

$menu = (new CliMenuBuilder)
    ->modifySelectableStyle(function (SelectableStyle $style) {
        $style->setUnselectedMarker('❅ ')
            ->setSelectedMarker('✏ ')

            // disable unselected marker
            ->setUnselectedMarker('')
        ;
    })
    ->build();

You may also change the marker for \PhpSchool\CliMenu\MenuItem\CheckboxItem:

<?php

use PhpSchool\CliMenu\Builder\CliMenuBuilder;
use PhpSchool\CliMenu\Style\CheckboxStyle;

$menu = (new CliMenuBuilder)
    ->modifyCheckboxStyle(function (CheckboxStyle $style) {
        $style->setUncheckedMarker('[○] ')
            ->setCheckedMarker('[●] ');
    })
    ->addCheckboxItem('Orange juice', function () {})
    ->addCheckboxItem('Bread', function () {})
    ->build();

and for \PhpSchool\CliMenu\MenuItem\RadioItem:

<?php

use PhpSchool\CliMenu\Builder\CliMenuBuilder;
use PhpSchool\CliMenu\Style\RadioStyle;

$menu = (new CliMenuBuilder)
    ->modifyRadioStyle(function (RadioStyle $style) {
        $style->setUncheckedMarker('[ ] ')
            ->setCheckedMarker('[✔] ');
    })
    ->addRadioItem('Go shopping', function () {})
    ->addRadioItem('Go camping', function () {})
    ->build();

Item Extra

You can optionally display some arbitrary text on the right hand side of an item. You can customise this text and you indicate which items to display it on. We use it to display [COMPLETED] on completed exercises, where the menu lists exercises for a workshop application.

Item Extra is currently limited to only selectable items (menus, checkboxes & radios included)

The third parameter to addItem is a boolean whether to show the item extra or not. It defaults to false.

<?php

use PhpSchool\CliMenu\Builder\CliMenuBuilder;
use PhpSchool\CliMenu\CliMenu;
use PhpSchool\CliMenu\Style\SelectableStyle;

$menu = (new CliMenuBuilder)
    ->modifySelectableStyle(function (SelectableStyle $style) {
        $style->setItemExtra('✔');
    })
    ->addItem('Exercise 1', function (CliMenu $menu) { echo 'I am complete!'; }, true)
    ->build();

If no items have display extra set to true, then the item extra will not be displayed. If you toggle the item to show it's item extra in a callback or at runtime it will render incorrectly.

In order to fix that you need to tell the menu to display item extra explicitly. You can do this when constructing the menu like so:

<?php

use PhpSchool\CliMenu\Builder\CliMenuBuilder;
use PhpSchool\CliMenu\CliMenu;

$menu = (new CliMenuBuilder)
    ->setItemExtra('✔')
    ->addItem('Exercise 1', function (CliMenu $menu) { 
        $selectedItem = $menu->getSelectedItem();
        if ($selectedItem->showsItemExtra()) {
            $selectedItem->hideItemExtra();
        } else {
            $selectedItem->showItemExtra();
        }       
    })
    ->displayExtra()
    ->build();

Menu Methods

The next set of documentation applies to methods available directly on the \PhpSchool\CliMenu\CliMenu instance. Typically you will invoke these methods whilst your menu is open in you action callbacks.

Redrawing the Menu

You can modify the menu and its style when executing an action and then you can redraw it! In this example we will toggle the background colour in an action.

<?php

use PhpSchool\CliMenu\Builder\CliMenuBuilder;
use PhpSchool\CliMenu\CliMenu;

$itemCallable = function (CliMenu $menu) {
    $menu->getStyle()->setBg($menu->getStyle()->getBg() === 'red' ? 'blue' : 'red');
    $menu->redraw();
};

$menu = (new CliMenuBuilder)
    ->setTitle('Basic CLI Menu')
    ->addItem('First Item', $itemCallable)
    ->addItem('Second Item', $itemCallable)
    ->addItem('Third Item', $itemCallable)
    ->addLineBreak('-')
    ->build();

$menu->open();

If you change the menu drastically, such as making the width smaller, when it redraws you might see artifacts of the previous draw as redraw only draws over the top of the terminal. If this happens you can pass true to redraw and it will first clear the terminal before redrawing.

<?php

use PhpSchool\CliMenu\Builder\CliMenuBuilder;
use PhpSchool\CliMenu\CliMenu;

$itemCallable = function (CliMenu $menu) {
    $menu->getStyle()->setWidth($menu->getStyle()->getWidth() === 100 ? 80 : 100);
    $menu->redraw(true);
};

$menu = (new CliMenuBuilder)
    ->setTitle('Basic CLI Menu')
    ->addItem('First Item', $itemCallable)
    ->addItem('Second Item', $itemCallable)
    ->addItem('Third Item', $itemCallable)
    ->addLineBreak('-')
    ->build();

$menu->open();

Getting, Removing and Adding items

You can also interact with the menu items in an action. You can add, remove and replace items. If you do this, you will likely want to redraw the menu as well so the new list is rendered.

<?php

use PhpSchool\CliMenu\Builder\CliMenuBuilder;
use PhpSchool\CliMenu\CliMenu;
use PhpSchool\CliMenu\MenuItem\LineBreakItem;

$itemCallable = function (CliMenu $menu) {
    foreach ($menu->getItems() as $item) {
        $menu->removeItem($item);
    }
    
    //add single item
    $menu->addItem(new LineBreakItem('-'));
    
    //add multiple items
    $menu->addItems([new LineBreakItem('-'), new LineBreakItem('*')]);
    
    //replace all items
    $menu->setItems([new LineBreakItem('+'), new LineBreakItem('-')]);

    $menu->redraw();
};

$menu = (new CliMenuBuilder)
    ->setTitle('Basic CLI Menu')
    ->addItem('First Item', $itemCallable)
    ->addItem('Second Item', $itemCallable)
    ->addItem('Third Item', $itemCallable)
    ->addLineBreak('-')
    ->build();

$menu->open();

Custom Control Mapping

This functionality allows to map custom key presses to a callable. For example we can set the key press "x" to close the menu:

<?php

use PhpSchool\CliMenu\Builder\CliMenuBuilder;
use PhpSchool\CliMenu\CliMenu;

$exit = function(CliMenu $menu) {
    $menu->close();
};

$menu = (new CliMenuBuilder)
    ->addItem('Item 1', function(CliMenu $menu) {})
    ->build();

$menu->addCustomControlMapping("x", $exit);

$menu->open();

Another example is mapping shortcuts to a list of items:

<?php

use PhpSchool\CliMenu\Builder\CliMenuBuilder;
use PhpSchool\CliMenu\CliMenu;

$myCallback = function(CliMenu $menu) {
    echo "Client 1\nClient 2\nClient 3\n";
};

$menu = (new CliMenuBuilder)
    ->addItem('List of [C]lients', $myCallback)
    ->build();

// Now, pressing Uppercase C (it's case sensitive) will call $myCallback
$menu->addCustomControlMapping('C', $myCallback);

$menu->open();

Item Keyboard Shortcuts

If you enable auto shortcuts CliMenuBuilder will parse the items text and check for shortcuts. Any single character inside square brackets will be treated as a shortcut. Pressing that character when the menu is open will trigger that items callable.

This functionality works for split items as well as sub menus. The same characters can be used inside sub menus and the callable which is invoked will depend on which menu is currently open.

Note: all shortcuts are lower cased.

To enable this automatic keyboard shortcut mapping simply call ->enableAutoShortcuts():

<?php

use PhpSchool\CliMenu\Builder\CliMenuBuilder;
use PhpSchool\CliMenu\CliMenu;

$myCallback = function(CliMenu $menu) {
    echo "Client 1\nClient 2\nClient 3\n";
};

$menu = (new CliMenuBuilder)
    ->enableAutoShortcuts()
    ->addItem('List of [C]lients', $myCallback)
    ->build();

$menu->open();

//Pressing c will execute $myCallback.

You can customise the shortcut matching by passing your own regex to enableAutoShortcuts. Be careful to only match one character in the first capture group or an exception will be thrown.

Dialogues

Flash

Show a one line message over the top of the menu. It has a separate style object which is colored by default different to the menu. It can be modified to suit your own style. The dialogue is dismissed with any key press. In the example below we change the background color on the flash to green.

<?php

use PhpSchool\CliMenu\Builder\CliMenuBuilder;
use PhpSchool\CliMenu\CliMenu;

require_once(__DIR__ . '/../vendor/autoload.php');
    
$itemCallable = function (CliMenu $menu) {
    $flash = $menu->flash("PHP School FTW!!");
    $flash->getStyle()->setBg('green');
    $flash->display();
};

$menu = (new CliMenuBuilder)
    ->setTitle('Basic CLI Menu')
    ->addItem('First Item', $itemCallable)
    ->addItem('Second Item', $itemCallable)
    ->addItem('Third Item', $itemCallable)
    ->addLineBreak('-')
    ->build();

$menu->open();

Confirm

Prompts are very similar to flashes except that a button is shown which has to be selected to dismiss them. The button text can be customised.

<?php

use PhpSchool\CliMenu\Builder\CliMenuBuilder;
use PhpSchool\CliMenu\CliMenu;

$itemCallable = function (CliMenu $menu) {
    $menu->confirm('PHP School FTW!')
        ->display('OK!');
};

$menu = (new CliMenuBuilder)
    ->setTitle('Basic CLI Menu')
    ->addItem('First Item', $itemCallable)
    ->addItem('Second Item', $itemCallable)
    ->addItem('Third Item', $itemCallable)
    ->addLineBreak('-')
    ->build();

$menu->open();

Inputs

Inputs - added in version 3.0 of cli-menu allow to prompt the user for input and validate it. The following types are supported: text, number and password. Inputs can be executed in any item callback. They have separate style objects which are colored by default different to the menu. They can be modified to suit your own style.

Each input is created by calling one of the ask* methods which will return an instance of the input you requested. To execute the prompt and wait for the input you must call ask() on the input. When the input has been received and validated, ask() will return an instance of InputResult. InputResult exposes the method fetch to grab the raw input.

Text Input

The text input will prompt for a string and when the enter key is hit it will validate that the string is not empty. As well as the style you can modify the prompt text (the default is 'Enter text:'), the placeholder text (the default is empty) and the validation failed text (the default is 'Invalid, try again').

<?php

use PhpSchool\CliMenu\Builder\CliMenuBuilder;
use PhpSchool\CliMenu\CliMenu;

$itemCallable = function (CliMenu $menu) {
    $result = $menu->askText()
        ->setPromptText('Enter your name')
        ->setPlaceholderText('Jane Doe')
        ->setValidationFailedText('Please enter your name')
        ->ask();

    var_dump($result->fetch());
};

$menu = (new CliMenuBuilder)
    ->setTitle('Basic CLI Menu')
    ->addItem('Enter text', $itemCallable)
    ->addLineBreak('-')
    ->build();

$menu->open();

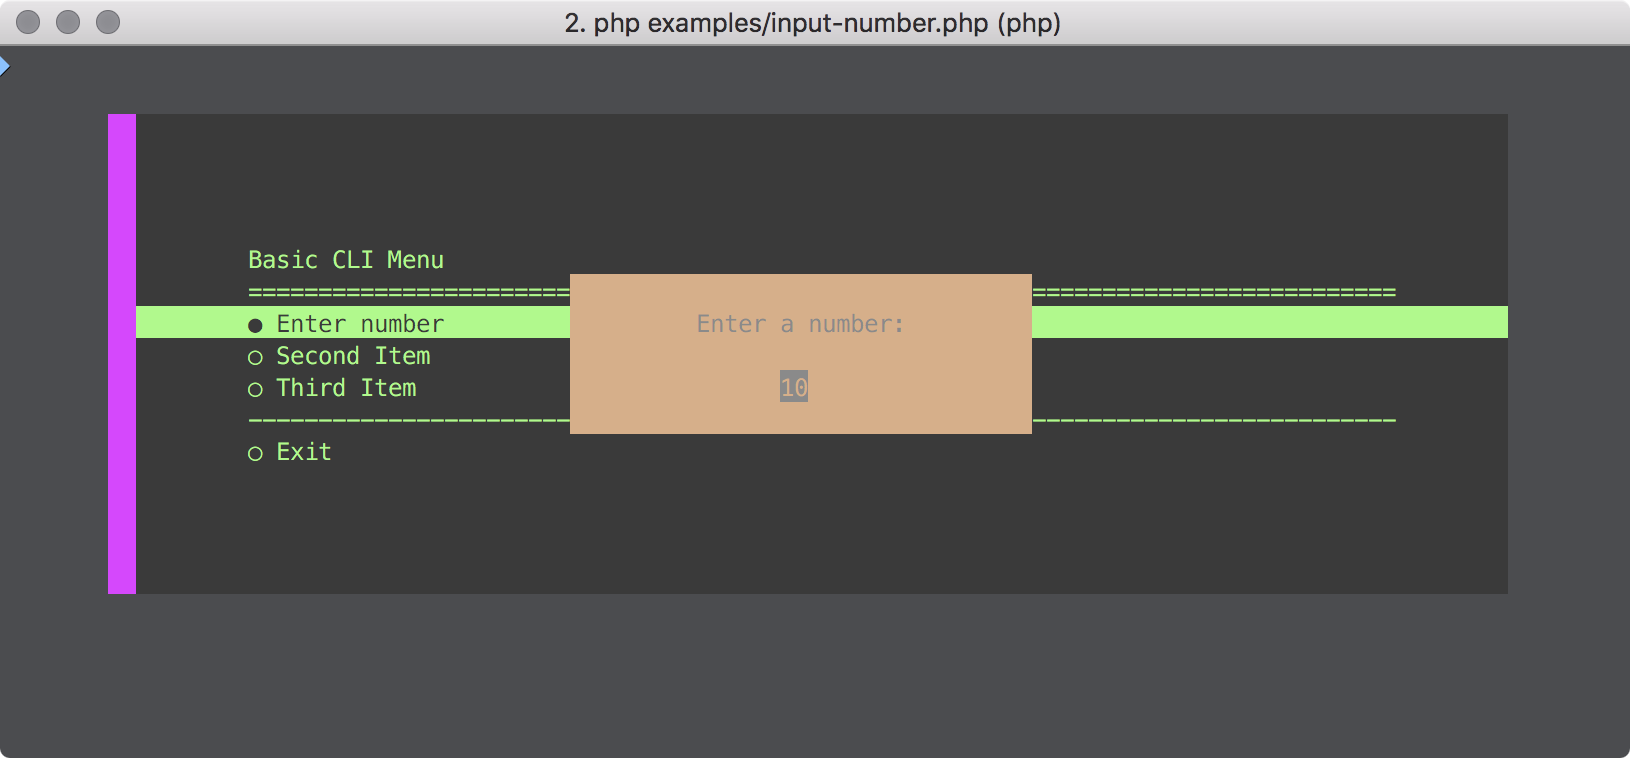
Number Input

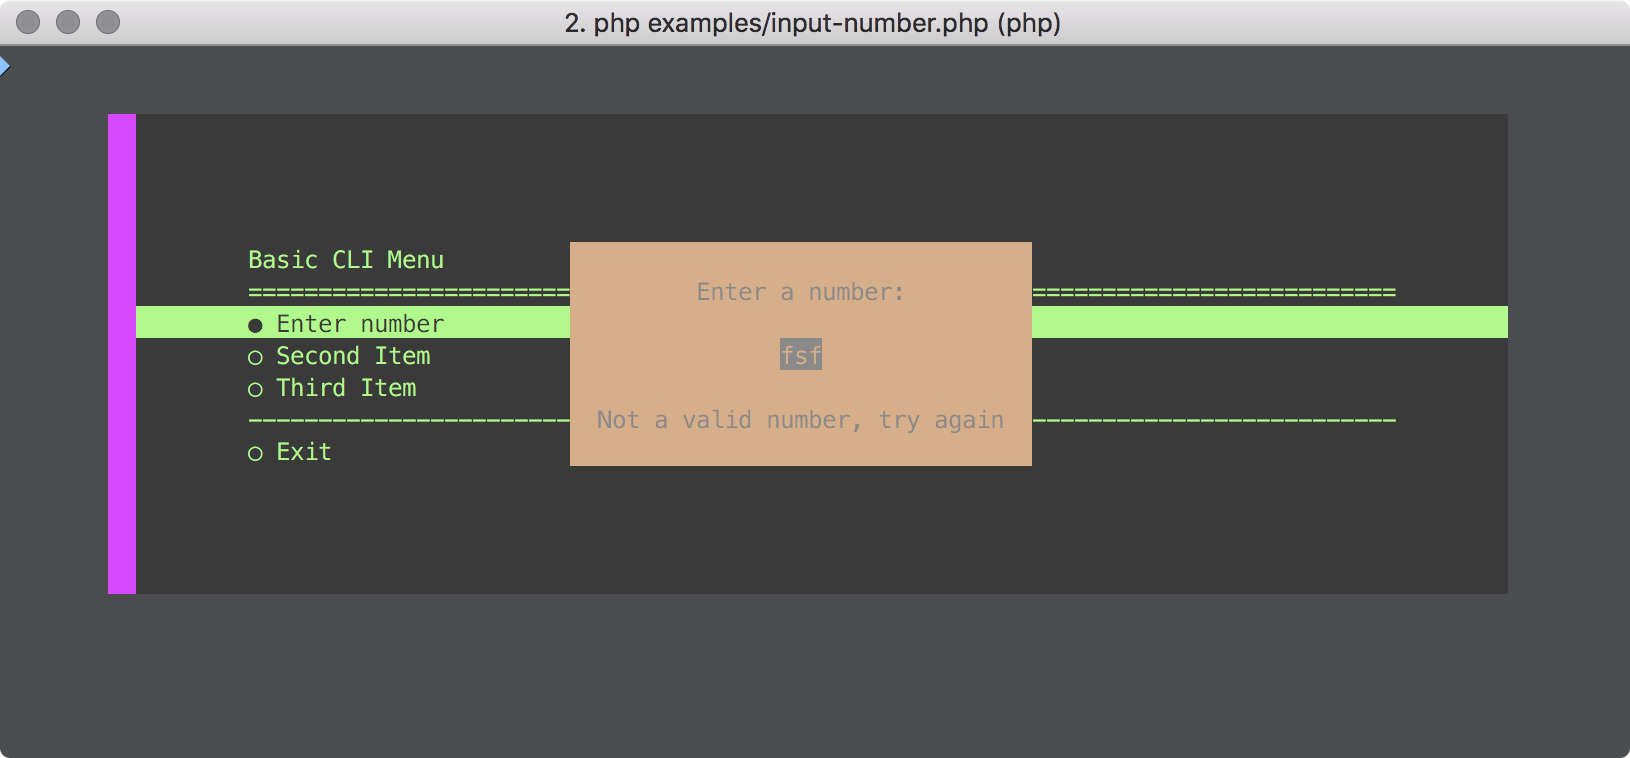
The number input will prompt for an integer value (signed or not) and when the enter key is hit it will validate that the input is actually a number (/^-?\d+$/). As well as the style you can modify the prompt text (the default is 'Enter a number:'), the placeholder text (the default is empty) and the validation failed text (the default is 'Not a valid number, try again').

When entering a number you can use the up/down keys to increment and decrement the number.

<?php

use PhpSchool\CliMenu\Builder\CliMenuBuilder;
use PhpSchool\CliMenu\CliMenu;

$itemCallable = function (CliMenu $menu) {
    $result = $menu->askNumber()
        ->setPromptText('Enter your age')
        ->setPlaceholderText(10)
        ->setValidationFailedText('Invalid age, try again')
        ->ask();

    var_dump($result->fetch());
};

$menu = (new CliMenuBuilder)
    ->setTitle('Basic CLI Menu')
    ->addItem('Enter number', $itemCallable)
    ->addLineBreak('-')
    ->build();

$menu->open();

Password Input

The password input will prompt for a text value and when the enter key is hit it will validate that the input is 16 characters or longer. As well as the style you can modify the prompt text (the default is 'Enter password:'), the placeholder text (the default is empty) and the validation failed text (the default is 'Invalid password, try again'). You can also set a custom password validator as a PHP callable. When typing passwords they are echo'd back to the user as an asterisk.

Ask for a password with the default validation:

<?php

use PhpSchool\CliMenu\Builder\CliMenuBuilder;
use PhpSchool\CliMenu\CliMenu;

$itemCallable = function (CliMenu $menu) {
    $result = $menu->askPassword()
        ->setPromptText('Please enter your password')
        ->setValidationFailedText('Invalid password, try again')
        ->setPlaceholderText('')
        ->ask();

    var_dump($result->fetch());
};

$menu = (new CliMenuBuilder)
    ->setTitle('Basic CLI Menu')
    ->addItem('Enter password', $itemCallable)
    ->addLineBreak('-')
    ->build();

$menu->open();

Validators can be any PHP callable. The callable will be passed the input value and must return a boolean, false indicating validation failure and true indicating validation success. If validation fails then the validation failure text will be shown.

It is also possible to customise the validation failure message dynamically, but only when using a Closure as a validator. The closure will be binded to the Password input class which will allow you to call setValidationFailedText inside the closure.

Ask for a password with custom validation. Here we validate the password is not equal to password and that the password is longer than 20 characters.

<?php

use PhpSchool\CliMenu\Builder\CliMenuBuilder;
use PhpSchool\CliMenu\CliMenu;

$itemCallable = function (CliMenu $menu) {
    $result = $menu->askPassword()
        ->setPromptText('Please enter your password')
        ->setValidationFailedText('Invalid password, try again')
        ->setPlaceholderText('')
        ->setValidator(function ($password) {
            return $password !== 'password' && strlen($password) > 20;            
        })
        ->ask();

    var_dump($result->fetch());
};

$menu = (new CliMenuBuilder)
    ->setTitle('Basic CLI Menu')
    ->addItem('Enter password', $itemCallable)
    ->addLineBreak('-')
    ->build();

$menu->open();

Ask for a password with custom validation and set the validation failure message dynamically:

<?php

use PhpSchool\CliMenu\Builder\CliMenuBuilder;
use PhpSchool\CliMenu\CliMenu;

$itemCallable = function (CliMenu $menu) {
    $result = $menu->askPassword()
        ->setPromptText('Please enter your password')
        ->setValidationFailedText('Invalid password, try again')
        ->setPlaceholderText('')
        ->setValidator(function ($password) {
            if ($password === 'password') {
                $this->setValidationFailedText('Password is too weak');
                return false;
            } else if (strlen($password) <= 20) {
                $this->setValidationFailedText('Password is not long enough');
                return false;
            } 
            
            return true;
        })
        ->ask();

    var_dump($result->fetch());
};

$menu = (new CliMenuBuilder)
    ->setTitle('Basic CLI Menu')
    ->addItem('Enter password', $itemCallable)
    ->addLineBreak('-')
    ->build();

$menu->open();

Custom Input

If you need a new type of input which is not covered by the bundled selection then you can create your own by implementing \PhpSchool\CliMenu\Input\Input - take a look at existing implementations to see how they are built. If all you need is some custom validation - extend the \PhpSchool\CliMenu\Input\Text class and overwrite the validate method. You can then use it in your menu item actions like so:

<?php

use PhpSchool\CliMenu\Builder\CliMenuBuilder;
use PhpSchool\CliMenu\CliMenu;
use PhpSchool\CliMenu\MenuStyle;
use PhpSchool\CliMenu\Input\Text;
use PhpSchool\CliMenu\Input\InputIO;

$itemCallable = function (CliMenu $menu) {
    
    $style = (new MenuStyle())
        ->setBg('yellow')
        ->setFg('black');
        
    $input = new class (new InputIO($menu, $menu->getTerminal()), $style) extends Text {
        public function validate(string $value) : bool
        {
            //some validation
            return true;
        }
    };
    
    $result = $input->ask();

    var_dump($result->fetch());
};

$menu = (new CliMenuBuilder)
    ->setTitle('Basic CLI Menu')
    ->addItem('Enter password', $itemCallable)
    ->addLineBreak('-')
    ->build();

$menu->open();

Dialogues & Input Styling

All of the dialogues and inputs expose a getStyle() method which you can use to customise the appearance of them. However, if you want to create a consistent style for all your dialogues and inputs without configuring it for each one you can build up a MenuStyle object and pass it to the dialogue and input methods like so:

<?php

use PhpSchool\CliMenu\Builder\CliMenuBuilder;
use PhpSchool\CliMenu\CliMenu;
use PhpSchool\CliMenu\MenuStyle;

$popupStyle = (new MenuStyle)
    ->setBg('green')
    ->setFg('magenta');
    
$itemCallable = function (CliMenu $menu) use ($popupStyle) {
    $menu->flash("PHP School FTW!!", $popupStyle)->display();
    $menu->confirm('PHP School FTW!', $popupStyle)->display('OK!');
    $menu->askNumber($popupStyle)->ask();
};

$menu = (new CliMenuBuilder)
    ->setTitle('Basic CLI Menu')
    ->addItem('First Item', $itemCallable)
    ->addItem('Second Item', $itemCallable)
    ->addItem('Third Item', $itemCallable)
    ->addLineBreak('-')
    ->build();

$menu->open();

Once you get going you might just end up with something that looks a little like this...

Learn You PHP CLI Menu

You can see the construction code here for more clarity on how to perform advanced configuration: PHP School

Integrations

Comments
  • addCustomControlMapping for opening subMenu ?

    addCustomControlMapping for opening subMenu ?

    I can set keyboard mapping for regular callables but I would like to use it to open a submenu.. any way to achieve that?

            $subMenu = function (CliMenuBuilder $b) {
                $b->setTitle('Behold the awesomeness')
                    ->addItem('Print Hello', function () { echo 'Hello!'; });
            };
    
            $exit = function (CliMenu $menu) {
                $menu->close();
            };
    
            $menu = (new CliMenuBuilder)
            ->addSubMenu('[S]uper Sub Menu', $subMenu)
            ->build();
    
            $menu->addCustomControlMapping('x', $exit);
            $menu->addCustomControlMapping('s', $subMenu);
    
            $menu->open();
    
    opened by vesper8 34
  • Implement item shortcuts

    Implement item shortcuts

    I've implemented shortcuts based on the code from #171 with support for getting the selected item. I've done it a bit different, in the builder. I think that's the better place for something like this. Eg added convenience using the raw methods on CliMenu.

    What do you think?

    @Lynesth @vesper8 @mikeymike

    Will write some docs if everyone likes :)

    opened by AydinHassan 22
  • Usage with symfony/console

    Usage with symfony/console

    Hey,

    most people use symfony/console for their cli applications.

    There you create a new ChoiceQuestion with all the answers and get the answer back as variable. This way you can continue with your script.

    This package needs a callback function when an answer is selected. That means you break out of your current function. That makes it really difficult to integrate into symfony/console applications.

    Would it be possible to provide this behaviour too?

    Maybe:

    $menu = (new CliMenuBuilder)
        ->setTitle('Basic CLI Menu')
        ->addItem('First Item')
        ->addItem('Second Item')
        ->addItem('Third Item')
        ->addLineBreak('-')
        ->inline()
        ->build();
    
    $menu->open();
    // execution pauses until an item is selected
    $item = $menu->getSelectedItem();
    
    opened by PhillippOhlandt 21
  • Custom and auto mappings can't override default

    Custom and auto mappings can't override default

    The default control mappings for keys includes "M" and "L" in the list, which prevents their being used for other purposes.

    For instance, neither of the following works:

    $menu->addCustomControlMapping('M', $myCallback);

    ->addItem('[M]ember List', $itemCallable2)

    Rather than throwing an exception, this should allow the default behavior of that key to be overridden (or removed). The L/R functionality of the L and M keys is already redundant and for a menu item like "Member List", there is no obvious choice of character that will work for the menu, particularly one that is large.

    opened by InterLinked1 18
  • Option to not clear the terminal window

    Option to not clear the terminal window

    Hey,

    right now when you open a menu, the window will get cleared and shows only the menu. That's ok for me and I can work with that but I prefer to not clear the window.

    An option on the menu builder to turn it off would be nice.

    help wanted hacktoberfest 
    opened by PhillippOhlandt 18
  • What's the life cycle of the menu?

    What's the life cycle of the menu?

    Hello!

    I'm having a problem where the menu won't close or won't exit the routine and it's a bit confusing to me why that is happening.

    I have a small method that creates a menu:

    //$options is a one level array of strings

    public function popup_menu($options){
           $itemCallable = function (CliMenu $menu) {
               $menu->close();
               $this->latest_menu_selection=$menu->getSelectedItem()->getText();
           };
    
           $menu = (new CliMenuBuilder)
               ->disableDefaultItems()
               ->setTitle('Basic CLI Menu');
           foreach ($options as $item){
               $menu->addItem($item, $itemCallable);
           }
           $menu->setBorder(1, 2, 'yellow')
               ->setPadding(2, 4)
               ->setMarginAuto()
               ->addItem('Exit', new ExitAction) //add an exit button
               ->build()->open();
           return $this->latest_menu_selection;
       }
    

    In the same class, I call this method twice with different $options.

    public function show_urls_menu(){
    
            $this->popup_menu(["Blue","Green"]);
            $this->popup_menu(['Apple',"oranges"]);
    }
    

    If I don't stop the execution, after the second menu, it loads again the first menu and the second menu 2 times.

    What am I doing wrong?

    Thanks!

    opened by taytus 15
  • Menu Dialog

    Menu Dialog

    Looking through the code, the confirm dialog is not actually a confirmation. It has no return value, am i missing something or the way it currently is just another layer in which a user cannot back out? It seems like there is nothing I can do with a dialog other than click enter. You cant even escape out.

    I am just asking to know if there is an alternative.

    opened by ccsliinc 12
  • Composer version differents to github repo

    Composer version differents to github repo

    Hi,

    when you install this package via composer, you get non-current version, which has no checkboxes. Last composer version is dated 8 month ago. Is that OK?

    opened by VladReshet 11
  • Item-specific styling

    Item-specific styling

    Currently all items are on the same vertical level:

        Example Title                                                                              
        ================================================================================================  
                                                                                                          
        Static Item #1                                                                                    
        ○ Item 1                                                                                          
        ○ Item 2                                                                                          
        ○ Item 3                                                                                          
        ○ Item 4                                                                                          
        Static Item #2                                                                                    
        ○ Item 1                                                                                          
        ○ Item 2                                                                                          
        ○ Item 3                                                                                          
        ○ Item 4                                                                                          
        Static Item #3                                                                                    
        [○] Item 1                      [○] Item 2                      [○] Item 3                        
                                                                                                          
        ------------------------------------------------------------------------------------------------  
        ● Exit                                                                                            
    

    Using line breaks makes it a little easier to separate elements:

        Example Title                                                                              
        ================================================================================================  
                                                                                                          
        Static Item #1                                                                                    
        ○ Item 1                                                                                          
        ○ Item 2                                                                                          
        ○ Item 3                                                                                          
        ○ Item 4                                                                                          
    
        Static Item #2                                                                                    
        ○ Item 1                                                                                          
        ○ Item 2                                                                                          
        ○ Item 3                                                                                          
        ○ Item 4                                                                                          
    
        Static Item #3                                                                                    
        [○] Item 1                      [○] Item 2                      [○] Item 3                        
                                                                                                          
        ------------------------------------------------------------------------------------------------  
        ● Exit                                                                                            
    

    This works fine but could be better. What do you think about an "itemIndent" vlaue in the MenuStyle that is applied only to SelectItem, RadioItem and CheckableItem?

        Example Title                                                                                     
        ================================================================================================  
                                                                                                          
        Static Item #1                                                                                    
           ○ Item 1                                                                                       
           ○ Item 2                                                                                       
           ○ Item 3                                                                                       
           ○ Item 4                                                                                       
        Static Item #2                                                                                    
           ○ Item 1                                                                                       
           ○ Item 2                                                                                       
           ○ Item 3                                                                                       
           ● Item 4                                                                                       
        Static Item #3                                                                                    
           [○] Item 1                   [○] Item 2                      [○] Item 3                        
                                                                                                          
        ------------------------------------------------------------------------------------------------  
        ○ Exit                                                                                            
    

    The indentation helps visually separate what is an actionable item and what is mostly text description:

    Peek 2019-12-17 21-39

    Let me know if this is something that would be interesting. I've got it implemented but needs some testing for the StringUtil::wordwrap() function that calculates terminal width and breaks up lines.

    opened by jtreminio 10
  • Self created new lines result in unexpected new lines in output

    Self created new lines result in unexpected new lines in output

    Source:

    $option = $this
        ->menu('Pizza menu:' . PHP_EOL . 'Name: Pizza by the slice' . PHP_EOL . 'Address: 12345 San-Francisco', [
            'Freshly baked' . PHP_EOL . 'muffins',
            'Freshly baked' . PHP_EOL . 'croissants',
            'Turnovers, crumb cake,' . PHP_EOL . 'cinnamon buns, scones'
     ])->open();
    

    Expected Output:

        Pizza menu:
        Name: Pizza by the slice
        Address: 12345 San-Francisco
        ----------------------------------------------------------------
    
        ● Freshly baked muffins
        ○ Freshly baked croissants
        ○ Turnovers, crumb cake, cinnamon buns, scones
        ○ Exit
    

    Real Output:

        Pizza menu:
        Name: Pizza by the slice
        Address: 12345
        San-Francisco
        ----------------------------------------------------------------
    
        ● Freshly baked muffins
        ○ Freshly baked croissants
        ○ Turnovers, crumb cake, cinnamon buns, scones
        ○ Exit
    

    I have no idea why there is an additional newline after the zip code. I have played around with str_pad but nothing helped.

    Additionally it would also be great if newlines could work well in the items:

        Pizza menu:
        Name: Pizza by the slice
        Address: 12345
        San-Francisco
        ----------------------------------------------------------------
    
        ● Freshly baked
        muffins
        ○ Freshly baked
        croissants
        ○ Turnovers, crumb cake,
        cinnamon buns, scones
        ○ Exit
    
    • The m from muffins is alligned with the dot but insted it should be alligned with the F.
    opened by simonschaufi 10
  • Modification of colours rendering + 256 colours support

    Modification of colours rendering + 256 colours support

    Disclaimer: It isn't finished yet

    So this adds support for 256 colors if the terminal supports it (it needs https://github.com/php-school/terminal/pull/8 to work).

    For now it only works if such colours are set using their number (0 to 255, see image attached) and doesn't yet fallback to 8 colours if not supported by terminal. I also want to add a full table of names->code association so that we can set them using their name.

    It also modifies the way colours escaped sequences are generated so that it only happens as little as possible (when colours are set) and not each time.

    It also makes use of the inverted escape sequence to set the colours for selected elements and the reset escape sequence to reset all colours/blod/whatever to their default value.

    Let me know what you think so that I continue on this, or not. As with my previous PRs, I'll fix the tests if it's accepted.

    List of colours: ktsqa

    Ain't it sexy ? mintty_2018-05-06_01-17-49

    opened by Lynesth 9
  • PHPStorm - How to debug

    PHPStorm - How to debug

    Traditionally, this project is debugged using the var_dump() function. If we use xdebug we get an error.

    Error reason: The program cannot get terminal parameters from the PHPStorm environment.

    I propose a little hack:

    diff --git a/src/UnixTerminal.php b/src/UnixTerminal.php
    index 879b1a7..2fdc248 100644
    --- a/src/UnixTerminal.php
    +++ b/src/UnixTerminal.php
    @@ -71,12 +71,14 @@ class UnixTerminal implements Terminal
     
         public function getWidth() : int
         {
    -        return $this->width ?: $this->width = (int) exec('tput cols');
    +        //return $this->width ?: $this->width = (int) exec('tput cols');
    +        return 33; // your terminal width
         }
     
         public function getHeight() : int
         {
    -        return $this->height ?: $this->height = (int) exec('tput lines');
    +        //return $this->height ?: $this->height = (int) exec('tput lines');
    +        return 17; // your terminal height
         }
     
         public function getColourSupport() : int
    @@ -166,7 +168,8 @@ class UnixTerminal implements Terminal
          */
         public function isInteractive() : bool
         {
    -        return $this->input->isInteractive() && $this->output->isInteractive();
    +        //return $this->input->isInteractive() && $this->output->isInteractive();
    +        return true;
         }
     
         /**
    

    Now you can work with the xdebug debugger, set breakpoints, and so on!

    opened by simonovich 3
  • setPromptText - multiline support

    setPromptText - multiline support

    Can you please suggest how to make multiline text for promt?

    The example below breaks the menu:

    $itemCallable = function (CliMenu $menu) {
        $result = $menu->askText()
            ->setPromptText("Text line 1\nText line 2\nText line 3")
            ->setPlaceholderText('')
            ->ask();
    
        var_dump($result->fetch());
    };
    

    Basic.php

    opened by simonovich 4
  • Windows compatibility: replace posix_isatty() with stream_isatty()

    Windows compatibility: replace posix_isatty() with stream_isatty()

    Hello,

    Giving it another try to check if there's a way to make this package windows compatible, i found stream_isatty() which is described on php documentation as a posix_isatty() replacement, and is windows compatible.

    What do you think?

    opened by underdpt 3
  • Terminal overflow and menu size

    Terminal overflow and menu size

    I encountered an issue when my menu is bigger than my terminal:

    https://user-images.githubusercontent.com/19191608/153231452-90b84923-f643-4c72-9ac0-5520246dea3a.mp4

    Is it possible to print the console line number only for the menu?

    I know I use stty binary to retrieve my terminal size:

    <?php
    	namespace Core\Console;
    
        class Tools
        {
    		/**
    		 * @return false|array
    		 */
    		protected static function _getSize()
    		{
    			$sttyCommand = 'stty size';
    			exec($sttyCommand, $outputs, $status);
    
    			if($status === 0 && count($outputs) >= 1)
    			{
    				if(preg_match('#^(?<rows>[0-9]+) (?<columns>[0-9]+)$#i', $outputs[0], $matches)) {
    					return $matches;
    				}
    			}
    
    			return false;
    		}
    
    		/**
    		 * @return false|int
    		 */
    		public static function getRows()
    		{
    			$consoleSize = static::_getSize();
    			return ($consoleSize !== false) ? ($consoleSize['rows']) : (false);
    		}
    
    		/**
    		 * @return false|int
    		 */
    		public static function getColumns()
    		{
    			$consoleSize = static::_getSize();
    			return ($consoleSize !== false) ? ($consoleSize['columns']) : (false);
    		}
        }
    

    Thank you

    bug 
    opened by Renji-FR 0
  • Grouped items

    Grouped items

    SplitItem radio works well:

    <?php
    
    use PhpSchool\CliMenu\Builder\SplitItemBuilder;
    use PhpSchool\CliMenu\CliMenu;
    use PhpSchool\CliMenu\Builder\CliMenuBuilder;
    
    require_once(__DIR__ . '/../vendor/autoload.php');
    
    $menu = (new CliMenuBuilder)
        ->setTitle('Header 1')
        ->addSplitItem(function (SplitItemBuilder $b) use ($itemCallable) {
            $b->addRadioItem('Item 1-A', function() {})
                ->addRadioItem('Item 1-B', function() {})
                ->addRadioItem('Item 1-C', function() {})
            ;
        })
        ->build();
    
    $menu->open();
    

    But it's not possible to have multiple groups of RadioItem within the same menu level:

    $menu = (new CliMenuBuilder)
        ->addStaticItem('Header 1')
        ->addRadioItem('Item 1-A', function() {})
        ->addRadioItem('Item 1-B', function() {})
        ->addRadioItem('Item 1-C', function() {})
        ->addLineBreak('---')
        ->addStaticItem('Header 2')
        ->addRadioItem('Item 2-A', function() {})
        ->addRadioItem('Item 2-B', function() {})
        ->addRadioItem('Item 2-C', function() {})
        ->build();
    
    $menu->open();
    

    Peek 2019-12-20 19-15

    Similarly, I want to be able to group non-RadioItem items together.

    I'm thinking a non-styled container item that can take any number of MenuItemInterface items.

    It has the following API:

    • addItem()
    • addItems()
    • setItems()
    • removeItem()

    If it contains no items, the parent CliMenu displays nothing - it is only a container of items and has no styling of its own, nor does it affect the UI.

    If it has items, it behaves as if those items were defined in-line with the parent menu.

    Example:

    $menu = (new CliMenuBuilder)
        ->addStaticItem('Header 1')
        ->addGroup(function (CliMenuBuilder $b) {
            $b->addRadioItem('Item 1-A', function() {})
                ->addRadioItem('Item 1-B', function() {})
                ->addRadioItem('Item 1-C', function() {})
            ;
        })
        ->addLineBreak('---')
        ->addStaticItem('Header 2')
        ->addGroup(function (CliMenuBuilder $b) {
            $b->addRadioItem('Item 2-A', function() {})
                ->addRadioItem('Item 2-B', function() {})
                ->addRadioItem('Item 2-C', function() {})
            ;
        })
        ->build();
    
    $menu->open();
    

    This would look identical to the GIF above.

    If no items are defined,

    $menu = (new CliMenuBuilder)
        ->addStaticItem('Header 1')
        ->addGroup(function (CliMenuBuilder $b) {
            $b->addRadioItem('Item 1-A', function() {})
                ->addRadioItem('Item 1-B', function() {})
                ->addRadioItem('Item 1-C', function() {})
            ;
        })
        ->addLineBreak('---')
        ->addStaticItem('Header 2')
        ->addGroup(function (CliMenuBuilder $b) {
        })
        ->build();
    
    $menu->open();
    

    then it acts as if the group isn't defined at all:

    image

    This will help group RadioItems in a vertical manner (without needing to use SplitItem), and allow grouping other item types for non-Menu work.

    In addition, I would suggest changing RadioItem::getSelectAction() to use this group feature to disable other items within the same group, vs using SplitItem.

    If the radio item does not belong to a group, behave as it already does and toggle off other radio items within the same CliMenu object.

    edit:

    Thinking about this, for initial PR it would be good to keep it simple and not give this class any styling at all. Simply a container, nothing else, but I could see it expending to keeping its own copy of styles and applying them to any children items.

    So this would basically end up being a submenu that's visible on the current menu without needing to select an item to view the children items within.

    opened by jtreminio 2
Releases(4.3.0)
  • 4.3.0(Dec 16, 2021)

  • 4.2.0(Dec 5, 2021)

  • 4.1.0(Oct 24, 2020)

    [4.1.0]

    Added

    • Ability to modify password length for password input (#235)
    • Improve the formatting of disabled menu items in different terminals (#236)
    • Support for PHP8 (#240)
    Source code(tar.gz)
    Source code(zip)
  • 4.0.0(Feb 18, 2020)

    [4.0.0]

    Added

    • Add PHP 7.4 support (#183)
    • CheckboxItem & RadioItem (#186, #189, #193, #194, #226)
    • Ability to force display extra (#187)
    • Individual style objects for each item type (#211, #212, #213, #214, #216, #230)
    • Method getStyle() to interface PhpSchool\CliMenu\MenuItem\MenuItemInterface

    Fixed

    • Fixed item extra rendering outside of menu (#66, #184, #187)
    • Fix unresponsive menu upon closing and reopening (#198)
    • Menu styles incorrectly propagating to submenus (#201, #210)
    • Various issues with the menu width, when the terminal was too small (#223, #220, #219)

    Removed

    • Remove rebinding $this in builder closures so we can access the real $this (#191, #192, #196)
    • Marker methods from PhpSchool\CliMenu\MenuStyle: #getSelectedMarker() #setSelectedMarker() #getUnselectedMarker() #setUnselectedMarker() #getMarker()
    • PhpSchool\CliMenu\MenuItem\SelectableTrait
    • Marker methods from PhpSchool\CliMenu\Builder\CliMenuBuilder: #setUnselectedMarker() #setSelectedMarker()

    Checkboxes

    Checkboxes

    Checkboxes Inline

    Radios

    Radios

    Radios Inline

    Source code(tar.gz)
    Source code(zip)
  • 3.2.0(Apr 30, 2019)

    [3.2.0]

    Added

    • Allow ESC key to "cancel" editing an input (#174)
    • Methods for disabling the default VIM mappings and setting your own (#172)
    • Ability to set custom validator on Text and Number inputs (#177)
    • Ability to turn on automatic item shortcuts (#176)
    Source code(tar.gz)
    Source code(zip)
  • 3.1.0(Mar 31, 2019)

  • 3.0.0(May 17, 2018)

    [3.0.0]

    Changed

    • Optimise redrawing to reduce flickering (#83)
    • Use parent menu terminal when creating sub menus to reduce object graph (#94)
    • Do not print right margin. Causes menu to wrap even when row fits in terminal (#116)
    • CliMenu throws a \RuntimeException if it is opened with no items added (#146, #130)
    • Sub Menus are configured via closures (#155)
    • Remove restriction of 1 character length for markers (#141)
    • Remove the mandatory space after markers for now they can be of any length (#154)

    Added

    • Added type hints everywhere (#79)
    • Added phpstan to the travis build (#79)
    • Input dialogue system for prompting users. Comes with text, number and password inputs (#81)
    • Added ability to pass already prepared CliMenuBuilder instance to CliMenuBuilder#addSubMenuFromBuilder (#85, 155)
    • Added CliMenu#addItems & CliMenu#setItems to add multiple items and replace them (#86)
    • Added custom control mapping - link any key to a callable to immediately execute it (#87)
    • Added MenuMenuItem#getSubMenu (#92)
    • Added alternate text to AsciiArtItem to display if the ascii art is too large for the current terminal (#93)
    • Added the ability to pass existing MenuStyle instance to dialogues and inputs for consistent themes and reduced object graph (#99)
    • Added CSS like borders (#100)
    • Added option to auto center menu with CliMenuBuilder#setMarginAuto (#103)
    • Added option to auto center menu with CliMenuBuilder#setMarginAuto (#103)
    • Added support for 256 colours with automatic and manual fallback to 8 colours (#104)
    • Added clear option to CliMenu#redraw useful for when reducing the terminal width (#117)
    • Added ability to set top/bottom and left/right padding independently (#121)
    • Added a new Split Item item type which allows displaying multiple items on one line (#127)
    • Added setText methods to various items so they can be modified at runtime (#153)
    • Added MenuStyle#hasChangedFromDefaults to check if a MenuStyle has been modified (#149)
    • Added CliMenu#setTitle and CliMenu#setStyle (#155)
    • Added CliMenuBuilder#getStyle to get the current style object for the menu

    Fixed

    • Fixed sub menu go back button freezing menu (#88)
    • Fixed centering ascii art items with trailing white space (#102)
    • Enable cursor when exiting menu (#110)
    • Fixed (#71) - changed padding calculation when row too long to stop php notices (#112)
    • Fixed wordwrap helper (#134)
    • Fixed selected item issues when adding/setting/removing items (#156)
    • Fix infinite loop when no selectable items in menu (#159, #144)

    Removed

    • Dropped PHP 5.x and PHP 7.0 support (#79)
    • Removed the Terminal namespace which has been migrated to php-school/terminal (#81)
    • Removed MenuStyle::getDefaultStyleValues (#149)
    • Removed CliMenuBuilder#setTerminal (#149)
    • Removed CliMenuBuilder#getSubMenu (#155)
    • Removed CliMenuBuilder#getMenuStyle (#155)
    • Removed CliMenuBuilder#end (#155)
    Source code(tar.gz)
    Source code(zip)
  • 2.1.0(Dec 11, 2017)

  • 2.0.2(Mar 1, 2017)

  • 2.0.1(Feb 15, 2017)

  • 2.0.0(Oct 27, 2016)

    [2.0.0]

    Fixed

    • PHPUnit deprecations - updated to createMock()

    Changed

    • Require ext-posix (#50)
    • Make MenuStyle easier to construct by only allowing changes to be made via setters (#45)

    Added

    • Added getStyle() to CliMenu to get access to the style object from the menu itself (#42)
    • Added redraw method to CliMenu which can redraw the menu immediately with any style changes. See examples/crazy-redraw.php for an example (#43)
    • Added tests for child menu style inheritance (#44)
    • Add getter getItems() to get all items from the menu (#46)
    • Add method removeItem(ItemInterface $item) to remove an item from the menu (#46)
    • Ability to toggle item extra while the menu is open - see examples/toggle-item-extra.php (#46)
    • Added dialogues flash and confirm - they both display some text on top of the menu, flash is dismissed with any key press where the confirm requires enter to be pressed on the provided button. See examples/confirm.php and examples/flash.php (#49)

    Removed

    • Removed windows terminal - many required terminal features are unavailable (#50)
    • Individual component instantiation restrictions (#41)
    screen shot 2016-10-27 at 22 23 23 screen shot 2016-10-27 at 22 24 01 Source code(tar.gz)
    Source code(zip)
  • 1.2.0(Oct 3, 2016)

It's a beautiful way to use powerful Linux/Unix tools in PHP

It's a beautiful way to use powerful Linux/Unix tools in PHP. Easily and logically pipe commands together, capture errors as PHP Exceptions and use a simple yet powerful syntax. Works with any command line tool automagically.

James Hall 745 Dec 30, 2022
☄️ PHP CLI mode development framework, supports Swoole, WorkerMan, FPM, CLI-Server

☄️ PHP CLI mode development framework, supports Swoole, WorkerMan, FPM, CLI-Server / PHP 命令行模式开发框架,支持 Swoole、WorkerMan、FPM、CLI-Server

Mix PHP 1.8k Jan 3, 2023
Termage provides a fluent and incredibly powerful object-oriented interface for customizing CLI output text color, background, formatting, theming and more.

Termage provides a fluent and incredibly powerful object-oriented interface for customizing CLI output text color, background, formatting, theming and

TERMAGE 75 Dec 20, 2022
A powerful command line application framework for PHP. It's an extensible, flexible component, You can build your command-based application in seconds!

CLIFramework CLIFramework is a command-line application framework, for building flexiable, simple command-line applications. Commands and Subcommands

Yo-An Lin 428 Dec 13, 2022
YAPS - Yet Another PHP Shell

YAPS - Yet Another PHP Shell Yeah, I know, I know... But that's it. =) As the name reveals, this is yet another PHP reverse shell, one more among hund

Nicholas Ferreira 60 Dec 14, 2022
💥 Collision is a beautiful error reporting tool for command-line applications

Collision was created by, and is maintained by Nuno Maduro, and is a package designed to give you beautiful error reporting when interacting with your

Nuno Maduro 4.2k Jan 5, 2023
Console - The Console component eases the creation of beautiful and testable command line interfaces.

Console Component The Console component eases the creation of beautiful and testable command line interfaces. Sponsor The Console component for Symfon

Symfony 9.4k Jan 7, 2023
Simple and customizable console log output for CLI apps.

Console Pretty Print Simple and customizable console log output for CLI apps. Highlights Simple installation (Instalação simples) Very easy to customi

William Alvares 3 Aug 1, 2022
An Elegant CLI Library for PHP

Commando An Elegant PHP CLI Library Commando is a PHP command line interface library that beautifies and simplifies writing PHP scripts intended for c

Nate Good 793 Dec 25, 2022
Cilex a lightweight framework for creating PHP CLI scripts inspired by Silex

Cilex, a simple Command Line Interface framework Cilex is a simple command line application framework to develop simple tools based on Symfony2 compon

null 624 Dec 6, 2022
PHP Version Manager for the CLI on Windows

This package has a much more niche use case than nvm does. When developing on Windows and using the integrated terminal, it's quite difficult to get those terminals to actually listen to PATH changes.

Harry Bayliss 49 Dec 19, 2022
PHP CLI tool which allows publishing zipped MODX extra to modstore.pro marketplace

MODX Extra Publisher PHP CLI tool which allows publishing zipped MODX extra to modstore.pro marketplace. Installation global? local? To install packag

Ivan Klimchuk 3 Aug 6, 2021
PHP CLI project to get an appointment from https://vacunacovid.catsalut.gencat.ca

covid_vaccine_bcn PHP CLI project to get an appointment from https://citavacunacovid19.catsalut.gencat.cat/Vacunacio_Covid/Vacunacio/VacunacioCovidRes

Gabriel Noé González 3 Jul 27, 2021
PHP CLI to add latest release notes to a CHANGELOG

changelog-updater A PHP CLI to update a CHANGELOG following the "Keep a Changelog" format with the latest release notes. Want to automate the process

Stefan Zweifel 15 Sep 21, 2022
unofficial cli built using php which can be used to upload and download files from anonfiles.com

Anonfiles CLI Table of Contents Introduction Features Screenshots Installation Contributing License Introduction Anon Files CLI can upload and downloa

Albin Varghese 8 Nov 21, 2022
Library for creating CLI commands or applications

Console Motivation: this library purpose is to provide a lighter and more robust API for console commands and/or applications to symfony/console. It c

Théo FIDRY 16 Dec 28, 2022
A handy set of Stringable mixins for CLI text.

Laravel Colorize A mixin for Laravel's Stringable to easily apply colors and styles to CLI text. Installation You can install the package via Composer

James Brooks 47 Oct 30, 2022
WP-CLI Trait Package Command

WP-CLI Trait Package Command Generate plugin or php model files e.g. post-type or taxonomy for WP-Trait Package in Develop WordPress Plugin. Installat

Mehrshad Darzi 2 Dec 17, 2021